

| uCoz Community » uCoz Modules » Web Polls, Guestbook and Tests » Instructions on adding tests to Tests module (illustrated tutorial) |
| Instructions on adding tests to Tests module |
Please familiarize yourself with these instructions before working with Tests module. The process of adding tests is described here in details.
“Add own test” 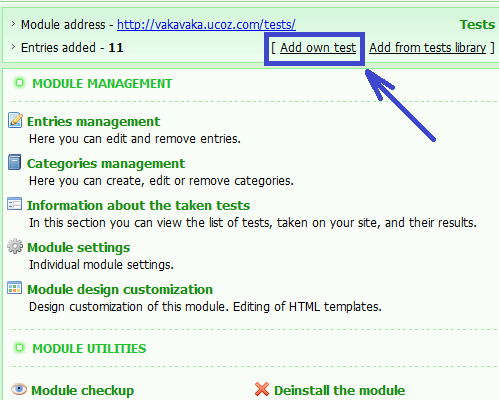 Part 1. Adding general information about the test, its settings. 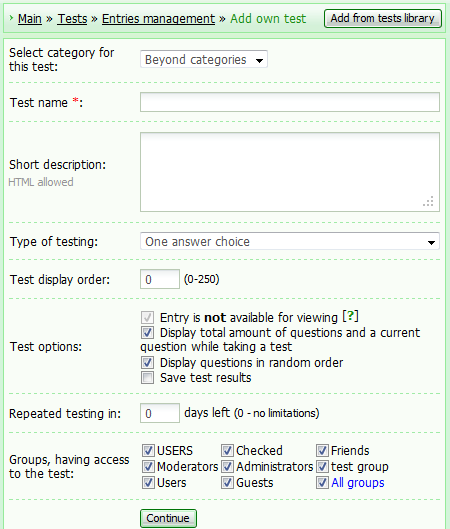 You will see this form right after you have clicked “Add own test” option. There are fields in it that are a part of common settings of the future test. - “Select category for this test” field. If your test is going to be in a category – select it from the list. If you do not select the category – the test will be added beyond categories and will be displayed on the main page of Tests modules right under the list of categories. - “Test name” field is mandatory. Try to come up with a name that will reveal the test content. - “Short description” field is for describing test content and testing methods, providing instructions etc. The field is not mandatory and HTML tags are allowed to be used there. - “Type of testing” field is the most important on this stage of test adding. The interface of the next stage of test adding depends on your answer here (either “One answer choice” or “Several answers choice”). If you plan on having several possible answers to one question – select “Several answers choice”. Otherwise select “One answer choice”. - “Test display order” field. You can manage tests sorting in the category or beyond the category with the help of this test. - “Test options” field. – “Entry is not available for viewing” option allows to make tests temporary inactive. This option is enabled at adding the test by default and this can not be changed. It is done like this, so you will have a chance to add and set the whole test correctly and only then publish it on the website. ATTENTION– after you have added the test and made sure it could be published - you need to find editing mode for this test and disable the describe above option when in this mode! – “Display total amount of questions and a current question while taking a test” option allows the user who takes the test to see the total amount of questions as well as the number of the current question. – “Display questions in random order” option enables such a mode, when test questions are displayed in random order. This mode will make it difficult for the user to memorize the order of correct answers, when taking the test one more time. – “Save test results” option enables logging of the test results for this very test. - “Repeated testing in” field. You may specify the number of days that need to pass for the user to be able to take this test again. If you set the value of this field as more than 0 – the user will see the notification that informs about the date of possible test repetition. - “Groups, having access to the test” field allows to have fine settings of users groups permissions. For example, you may allow all the groups to take test, but have more strict permissions for this test in particular. Part. 2.1. Adding questions to the test (for the test with “One answer choice” option) 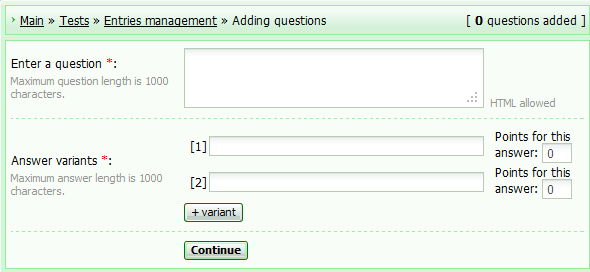 This is the main stage of adding the test. You add one question by filling in one form. You may add from 1 to 1000 questions to the test. You may add from 2 to 100 answer variants to each question. All the fields are mandatory. If you want to add one more question after adding the current one, click “Continue”. If this question is the last – click “Finish adding questions”. - “Enter a question” field is mandatory. Maximum question length is 1000 characters. HTML tags usage is allowed. The text of the current question is supposed to be typed in here. - “Answer variants” field is mandatory. Maximum answer length is 1000 characters. You need to type in at least two answer variants. In case you need more than two – add them via “+ variant” button. Each question may have different number of answer variants. - “Points for this answer”. You set the value of each answer here. Usually it goes like this: the correct answer gets 1 point and the rest – 0. In this way you get the number of points that equals the number of correct answers at the end. Part 2.2. Adding questions to the test (for the test with “Several answers choice” option)  You add questions to the test with “Several answers choice” option in the same way you do it with regular tests (described above). The only difference is “Permitted number of answers” field, which is present in this form. They are calculated automatically, based on the number of answer variants for the current question. If the “from” and “to” values are equal, for example their value is 2, the user will have to select 2 answers to the question. In case the “from” and “to” values are for instance 2 and 3, it means that the user will have to select not less than 2 answers, but not more than 3 answers. Part 3. Adding test results. 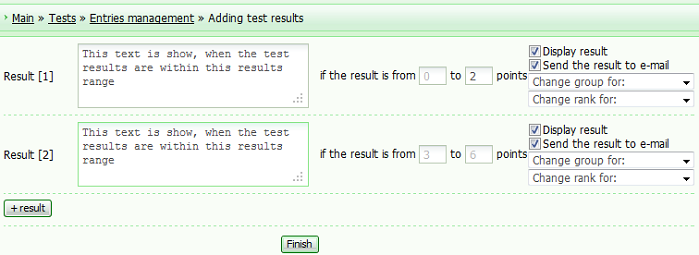 This is the final step of adding the test. Test results are added at this stage and actions for each result are appointed. As there can be several test results (depending on the score), the results range may be set at this stage. The minimal amount of results is 2. In case you need to have more results – add them with “+result” button. There are mandatory fields for each result. Describe each of them in details. - “Result” field. The textual test results are supposed to be here. (The definition of what the numerical results stand for). - “if the result is from ...to” fields are numerical fields. The minimal and the maximal values of the current results range are specified here. If the user's points are within this results range, the text of “Result” field will be shown to such a user. ATTENTION!The majority of calculations of the results ranges are done automatically! The maximal and the minimal amount of points is calculated on the basis of the typed by you data. They are submitted to the value of “from” field of the first results range and “to” field of the last results range. All the typed by you numbers should be within the range of the minimal and the maximal results. “from” field value is calculated automatically as well. It will always be 1 point higher than the value of “to” field of the previous results range. It is done so to minimize the mistakes the user might make, when adding the test. |
Is it possible to add later more questions to the test or not? When I click on the Edit test button I can only edit the current questions but I can't find a button to add new questions.
http://banovci.ucoz.net
http://guardsofaden.ucoz.ru http://jeftinodosajta.com ------------------------------- With uCoz since 2007. |
Hi something is wrong with my test module..
I try to add test, while adding questions, when i click on Continue, it says 0 questions added. Even after adding another qsm, again it says zero qsn added. And there is no "Finish adding qsuestion" button. Please help. Previously it was working fine.. I restored default template also for test module, no luck. URL; http://shankysportal.com/ shankys.ucoz.com http://shankysportal.com/tests/linux_open_system/1 
Attachments:
9632887.png
(50.1 Kb)
|
I search all over the thread to find my problem with no success, I want to know if you can increase the number of questions per page in Test Module. Currently it displays only one question per page then you click the button to go to the next question.
|
pendekar, it's possible to disable the limit within the VIP plan. Also, I can suggest you look at the Google forms, where the limit is more flexible.
|


| |||