

|
| uCoz Community uCoz Modules Site Users DISABLE CAPTCHA FOR "USERS" GROUP (illustrated tutorial) |
| DISABLE CAPTCHA FOR "USERS" GROUP |
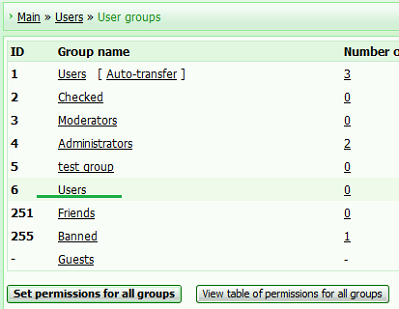
Sometimes a need to disable captcha at websites with local users method of authorization arises. In this way user will not have to type in captcha when sending messages, comments, PMs. The settings of the system group “Users” are so that it is not possible to disable captcha for them completely. WARNING: You need to understand that captcha is a good way to protect your websites from spam. NOTE: This way of disabling captcha is available only on websites with Local registration! It is because global uNet registration form can not be edited! ADDITION: It is possible to change "Allowed methods of users authorization" from uNet users to Local users, by buying any package or a service that costs more than 2 dollars once and the feature will be enabled for the whole period of the website existence! How to disable captcha for “Users” group? Step 1: Create new “Users” group. Explanation: The settings of the system group “Users” are so that it is not possible to disable captcha for them. This is a system protection. To be able to edit group permissions you need to transfer users to a newly-created group and set group permissions there. The permissions of all the groups created by you can be edited without any limitations! Go to Control panel->Users->User groups->Create new user group->User group name *: Users (name this group Users, just like the system group)->Group options: check the box “Allow to select this group during registration”->click Save. From now on you will have an option of two “Users” groups at registration. The first is a system group and the second one is created by you. Step 2: Edit Users registration form: Substitute the default Users registration form: Code <?if($GROUP_FL$)?> <tr id="siM70"><td class="manTd1" id="siM71">$GROUP_SIGN$</td><td class="manTd2" id="siM72">$GROUP_FL$</td></tr><tr><td height="10" class="manTdSep" colspan="2"><hr class="manHr" /></td></tr> <?endif?> with: Code <?if($GROUP_FL$)?> <tr id="siM70"><td class="manTd1" id="siM71">Group<font class="manStar" color="red">*</font>:</td><td style="" class="manTd2" id="siM72"><input id="grp1" class="manFlGrp" name="grp" value="1" checked="checked" type="radio"style="display:none;"> <label for="grp1"style="display:none;">Users</label> <input id="grp6" class="manFlGrp" name="grp" value="6" type="radio" > <label for="grp6">Users</label><?endif?> where: Code <input id="grp1" class="manFlGrp" name="grp" value="1" checked="checked" type="radio"style="display:none;"> <label for="grp1"style="display:none;">Users</label> Code <input id="grp6" class="manFlGrp" name="grp" value="6" type="radio" > <label for="grp6">Users</label> Attention! “Value” should equal the ID number of the created by you group. In my case it is “6”. But it can be any other number in yours. Another option is to embed the shortened form: Code <?if($GROUP_FL$)?> <tr id="siM70"><td class="manTd1" id="siM71">Group<font class="manStar" color="red">*</font>:</td><td style="" class="manTd2" id="siM72"><input id="grp6" class="manFlGrp" name="grp" value="6" type="radio" > <label for="grp6">Users</label></td></tr> <?endif?> where: Code <input id="grp1"...<label for="grp1" After editing the template of Users registration form, user will see only the created by you group, when selecting the group at registration. Step 3: Set group permissions: Such feature as “No security code required” will work correctly for the newly-created not-system “Users” group. Members of this group will not be able to see captcha. Go to Control panel->Users->User groups->Set permissions for all groups->Other->No security code required ->check the box with the newly-created group->click Save at the bottom. Step 4: Users transfer: The only thing left is to transfer users who are registered in the system group to the newly-created “Users” group.Go to Control panel->Users->Mass users transfer/removalNOTE: it is better to re-name the system group (e.g. “USERS” in the upper case) for you not to mix it up with the newly-created “Users” at transfer. 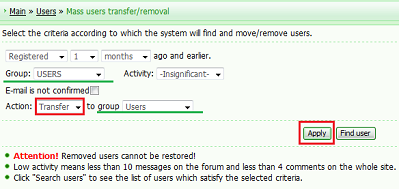 |


| |||
| |||

Need help? Contact our support team via
the contact form
or email us at support@ucoz.com.