

|
| uCoz Community uCoz Modules Online Shop Setting Up Goals in Google Analytics for Your Online Store |
| Setting Up Goals in Google Analytics for Your Online Store |
 Today I will tell you about a new and very useful setting for uCoz online shops. It will let you connect your E-shop to your Google Analytics account and correctly follow and analyze conversions. I.e. you will see what pages and in what order your visitor browse before submitting an order. It was possible to set up goals before, but now you can do this really quickly and correctly with the help of the new feature and this guide. It should be also noted that some shops accept orders not only online, but also by phone, and keeping track of such customers is quite a different story. Though you can always just ask them, at the end of your conversation. Why Do You Need to Set Up Goals? Each owner of an online shop has one aim - sales. Those who have counters on their websites can get the number of pageviews and new users. But you, as a shop owner, must be interested not only in the number of viewed pages, but also in exact actions of your customers. E.g., if a user started to submit an order and then stopped for some reason and didn't finish the submission. And Google Analytics goals record actions of visitors, and also show the percentage of visitors doing certain actions. The percentage ratio of visitors, who performed a certain action, to the total number of visitors is called conversion. Knowing this parameter will allow you to understand how effective your shop is. Google Analytics will also help you see the path your visitors follow before reaching their final goal. By analyzing such reports you will understand during which stages of order submission the visitors leave the website, and therefore optimize these pages. Setting up the tools to track such parameters is not the easiest task, but it is totally worth the efforts. So, let's set up goals in Google Analytics for your E-shop step by step. Connecting Google Analytics to E-shop Before settings up goals, make sure you have a Google Analytics account and the counter is installed on the website pages. If not, sign up and install the code. The sign-up process is easy, so let's proceed to the next step. Log in to your Google Analytics account, open Property settings and copy the tracking id. It looks as follows: 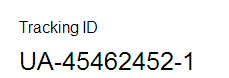 Then go to the Control Panel of your uCoz website and choose E-shop, then go to the module settings. 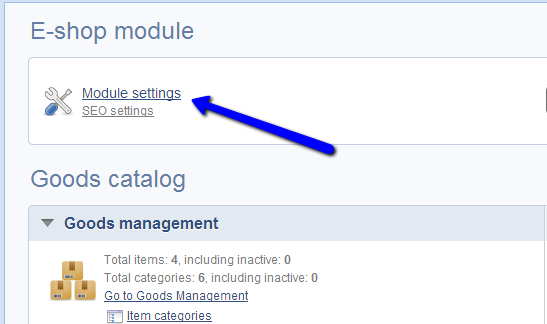 You will see a block titled "Google Analytics settings" on the settings list. Tick "Enable" and copy the Google Analytics tracking ID into the "UA id" field (Note: copy the whole ID, not only the numbers). 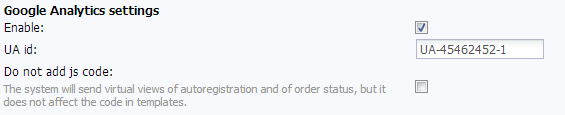 Note: "Do not add js code" - this option is for advanced users who are planning to add the code by themselves. In this case only virtual views about order status change and autoregistration data will be sent. Now your Google Analytics account is connected to your E-shop and you can create goals. Creating Goals in Google Analytics To set up goals in Google Analytics, go to the "Admin" section. 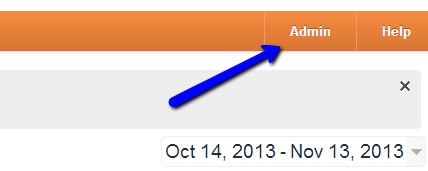 Then click "Goals". 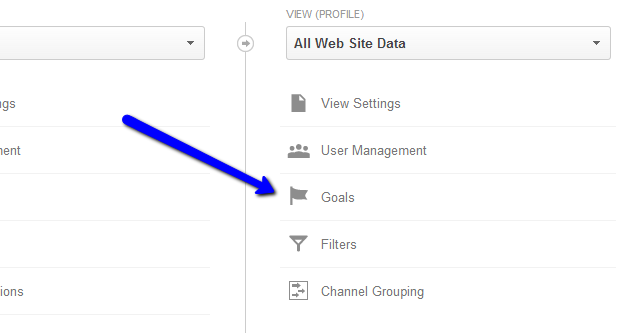 Click "Create a goal" and you will see the form where you need to enter a goal name (in our case it will be "Paid orders") and choose a goal type: 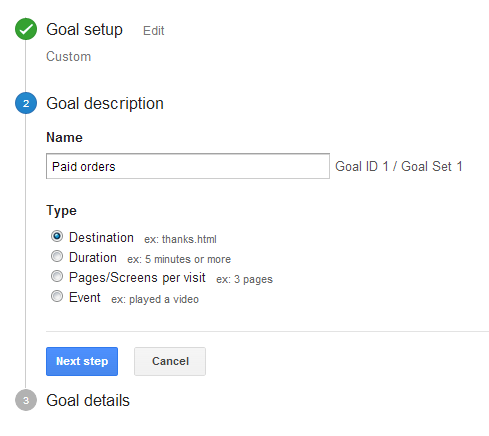 As you can see, the goals can be different:
The "destination" type allows to set a path of several steps that a user comes through before reaching the final goal. Most online stores use this goal type. The next step requires entering the address of a destination page and enabling a path. 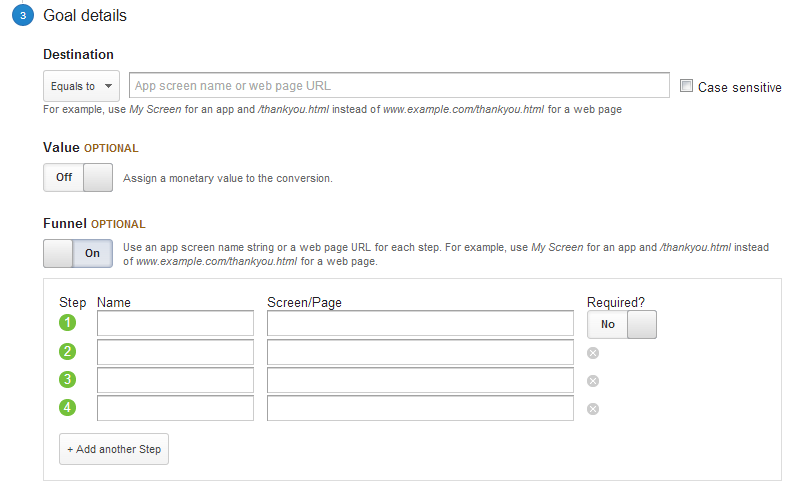 Google requires a destination and steps to be specified as URLs, but due to technical peculiarities of uCoz we can't just copy the addresses of web pages because the goals will work incorrectly due to the fact that actually different checkout steps have one and the same address. To avoid this, we will use virtual pageviews. Virtual pageviews is the feature in Google Analytics that imitates a page or a button click. The data about visits of such nonexistent pages or clicks is recorded by Google Analytics and then displayed in reports. If you have connected Google Analytics to your online shop correctly and have filled in all the necessary fields in the module settings, the virtual pageviews will be added to the code of your website automatically. We have created several virtual pageviews. You can use either all of them or only a part. Which ones to use is up to you and the specifics of your shop. List of Virtual Pageviews and Corresponding Actions
Below are two examples of how virtual pageviews can be used. The first one is for an online shop that sells electronic items, and the second one is for a shop that sells tangible products. For an online shop that sells electronic items, we will build a path consisting of five virtual pageviews that are the most common in our opinion.
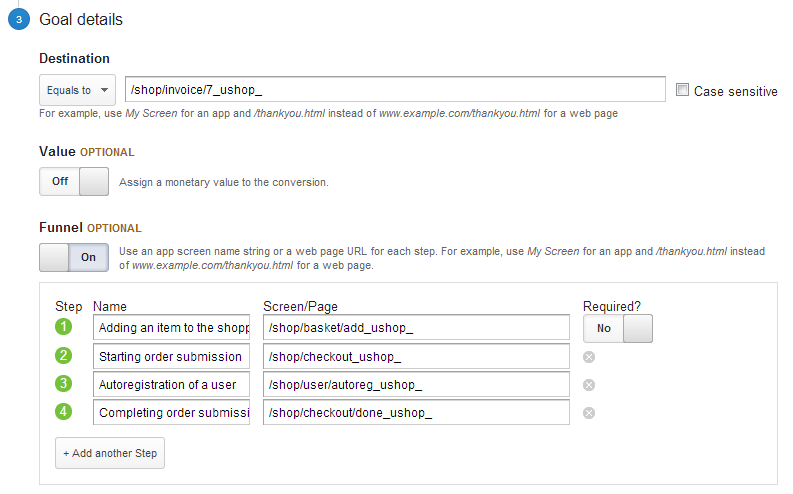 Please note that the last virtual pageview (/shop/invoice/7_ushop_) must be pasted into the "Destination" field, because Google thinks in the following way: there is one final goal, but to achieve it a user must go through a sequence of steps. And the steps are added in the order described above. Save the changes and that's it, we've set up the goals. As for online shops that sell tangible products, the following sequence of virtual pageviews can be used for them:
The destination is set in the same way as the one in the previous example. Please note that in this case it's better to use "Submitted orders" as the goal title, instead of "Paid orders". Results Viewing To view the results of the set up goals go to the "Reporting" section and find "Conversions" on the left menu. 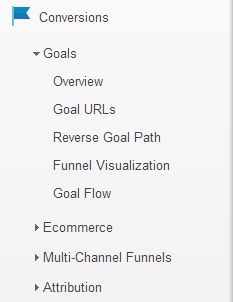 To evaluate the results, we recommend that you use several report types: Overview, Funnel Visualization, Goal Flow etc. Let's take "Funnel Visualization" as an example, as it's the best type to analyze the data of our goal "Paid orders" (it was set for online shops that sell electronic items). 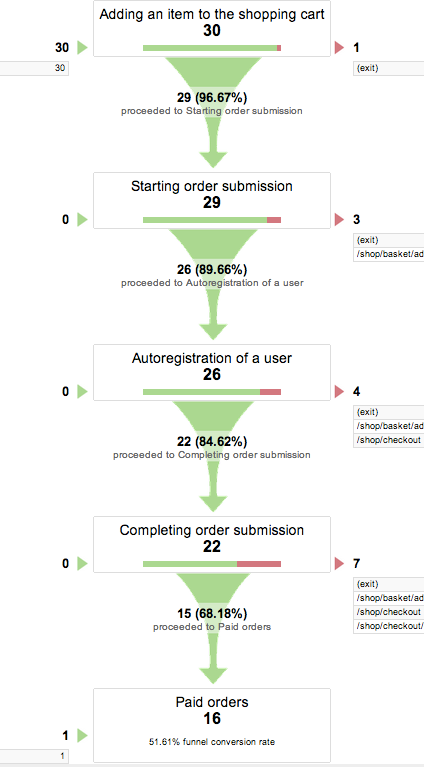 In this report you can see how many customers have reached the final destination, and how many of them left and on which steps. I.e. we can see that 30 customers came to the first step, 29 of which "Started order submission", and one left. 16 orders were paid in total, and the funnel conversions rate made 51,61%. The conversion rate is so high because it is a test shop and the orders were submitted intentionally. Usually the rate is much lower for real functioning online stores. Filtering Sometimes virtual views have such unpleasant feature as overstating the data on the number of page hits in genetal website reports. For the data to be displayed correctly, we suggest that you create a duplicate website profile in Google Analytics and create there a filter. The filer should be set up in the duplicate profile because it you make a mistake when setting it up, the reporting data will be collected incorrectly and you won't be able to restore the correct data. So, to duplicate the profile, go to "Admin" -> "View Settings". 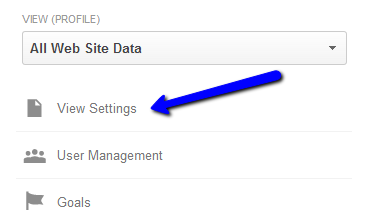 You will see the button "Copy view" at the bottom of the page. 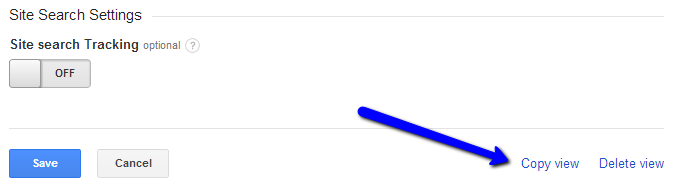 After you have copied the profile, go to "Admin" -> "Filters". Now we need to create a filter that will forbid Google to collect data from the virtual pages, that have the same parameter. In our case such parameter is "_ushop_" - it is present at the end of each virtual URL. Click "New filter" and fill in the form that will appear. 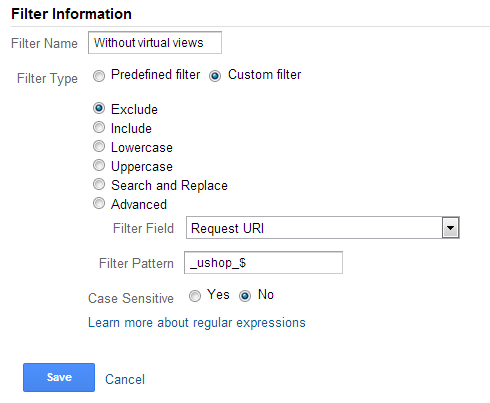 Don't forget to enter the additional symbol $ into the "Filter Pattern" field. It will mean that all URLs, ending with "_ushop_", will be counted. Conclusion We have finished setting up the goals. Now you have two profiles in your Google Analytics account: one without a filter where you can track conversions, and the other with a filter where you will be able to view general website reports ("Audience", "Acquisition" etc). We are going to add new variants of pre-set pages for tracking, e.g. purchases of returning customers who already have accounts in your shop. We suggest that you try this feature in your online shop. Setting up goals in Google Analytics won't take much time, but it will give you new possibilities to study the behavior of your customers. I'm not active on the forum anymore. Please contact other forum staff.
|


| |||
| |||

Need help? Contact our support team via
the contact form
or email us at support@ucoz.com.