

| uCoz Community uCoz Modules Additional Features Windows Live E-mail Hosting (Full Tutorial) (An alternative to the Google Apps e-mail hosting.) |
| Windows Live E-mail Hosting (Full Tutorial) |
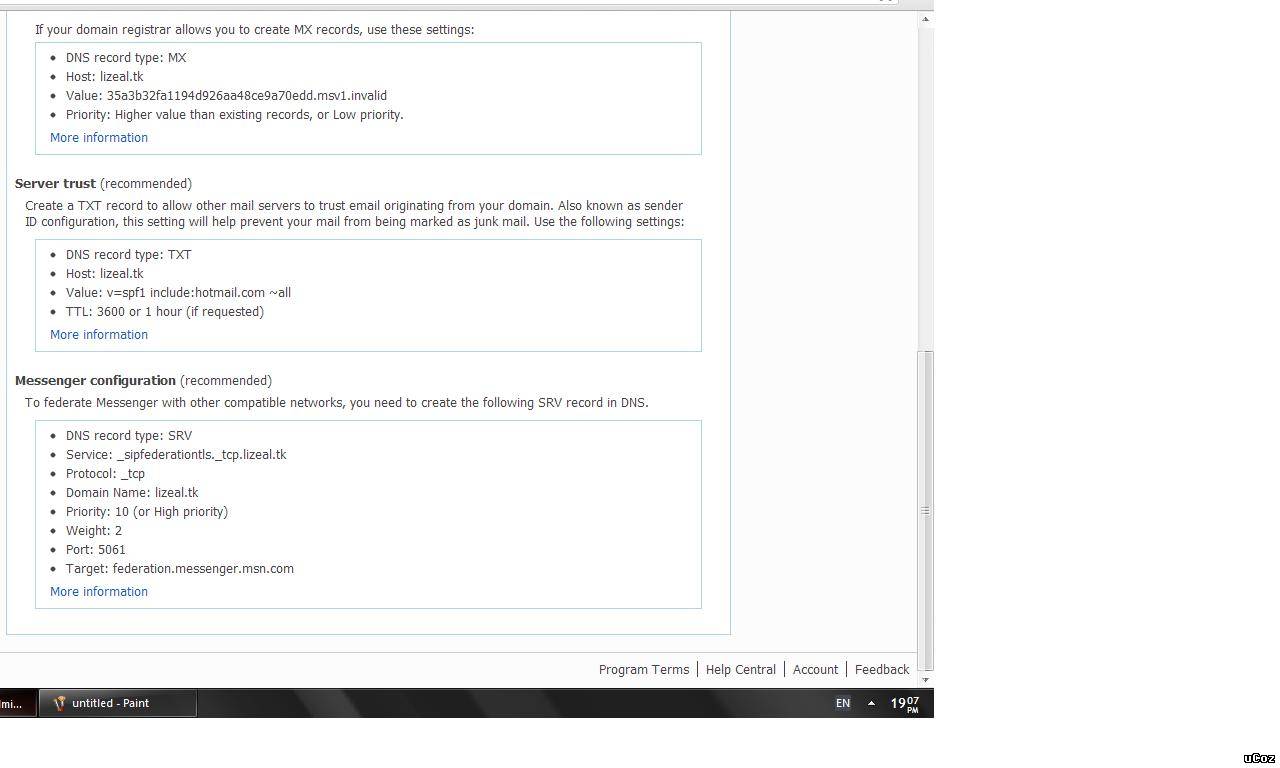
 Introduction Requirements What you will learn from this? Added (2011-01-06, 3:58 Am) (CLICK IMAGES TO ENLARGE) STEP 1: STEP 2: STEP 3: STEP 4: STEP 5: STEP 6: STEP 7: STEP 8: STEP 9: STEP 10: Added (2011-01-06, 3:59 Am) (CLICK IMAGES TO ENLARGE) STEP 1: STEP 2: STEP 3: Added (2011-01-06, 3:59 Am) (CLICK IMAGES TO ENLARGE) STEP 1: SUBTUTORIAL - STEP 1a: SUBTUTORIAL - STEP 1b: SUBTUTORIAL - STEP 1c: SUBTUTORIAL - STEP 1d: SUBTUTORIAL - STEP 1e: STEP 2: STEP 3: Added (2011-01-06, 4:00 Am) (CLICK IMAGES TO ENLARGE) STEP 1: STEP 2: STEP 3: STEP 4: Added (2011-01-06, 4:00 Am) "Friends don't let friends use Internet Explorer 6." - Microsoft || Join the cause. Help your friends.
  |
I sent a request to CreativeCollusions as well as to Natashko to hopefully have this thread moved to the Additional Features category since that is the place where the domain attachment and etc are posted under.

"Friends don't let friends use Internet Explorer 6." - Microsoft || Join the cause. Help your friends.
|
Hey. Can I close the window while waiting?
Added (2011-01-23, 9:36 PM) Added (2011-01-24, 8:41 PM) |
Quote (SirDarknight) I just waited 3.5 Hrs. But When I Refresh It comes the same page again. Why? And My Session Time Was out too. Which part of the tutorial are you trying to follow? Configuring Windows Live to Work With Your uCoz Website? "Friends don't let friends use Internet Explorer 6." - Microsoft || Join the cause. Help your friends.
|
After I have clicked save after adding the Number and value (e.g 20156118621 and domain.live.com)
I waited 3.5 hrs. Before Clicking Refresh as you told Quote Final step is back at the Windows Live page. On the part where it says You need to prove ownership of this domain by creating an MX record or a CNAME record. Use the settings below., there is a Refresh button. Wait for 3 to 4 hours (sometimes even more number of hours) before clicking the Refresh button in order to allow the uCoz servers some time to update your changes.
Quote Sorry, For posting this here How Do I get a pet like you? Post edited by SirDarknight - Tuesday, 2011-01-25, 4:06 PM
|
Quote (SirDarknight) After I have clicked save after adding the Number and value (e.g 20156118621 and domain.live.com) I waited 3.5 hrs. Before Clicking Refresh as you told Did you complete Step 7 correctly? What did the message tell you? Quote (SirDarknight) Sorry, For posting this here How Do I get a pet like you? You get it at http://magistream.com/ just register for an account and select from the stream of eggs.. "Friends don't let friends use Internet Explorer 6." - Microsoft || Join the cause. Help your friends.
|
Okay, What Should I do to start it from 1st step again?(I want to remove everything I did)
|
when this thread created?
actually last month june ive created a free email hosting via Gmail but sad to say it will expire within one month. CoffeeCone, Does live mail or hotmail will not be expired just like google? as for now im configuring the zoho mail and prinfection.. need answer asap.., 
1F4BF3B
|
this is what ive got when confirming my website ownership.
di ko talga maintindihan sir coffecone. pa help plssss. Attachments:
7145013.jpg
(74.4 Kb)
·
3790657.jpg
(80.3 Kb)
1F4BF3B
|
any help of this please im not quite sure of what im doing or i done it wrong it seems that there is nothing change when i hit save in the expert mode saving system of domain attachment.
Here the preview... 
Attachments:
5938713.jpg
(112.1 Kb)
1F4BF3B
|
Thank you for taking the time off work to do this!! It was helpful and I managed to follow all the steps. I hope ucoz update their information soon because Gmail is no longer a free option. Next I hope to follow http://www.howtogeek.com/howto/17328/add-hotmail-live-email-accounts-to-outlook-2010/ so that I can use my new email account from within Outlook. There are two options on this tutorial - a business type option, or down the bottom how too add just send and receive functionality through Outlook 2010.
|


 I myself have been part of this sad but true incident. I waited for months for a response from them to my dismay, nothing came. That's the reason I tried to use alternatives. One of which is the service of Windows Live which you can find at


 I didn't even go to work today just so I can deal with this. Hope it's worth it and hope this helps you all. If you have questions or if I failed to cover some things that you want to know about, don't hesitate to post in this thread. I will try to answer it as much as I can.


| |||
