

|
| uCoz Community uCoz Modules Additional Features Visual or WYSIWYG Editor (Illustrated manual) |
| Visual or WYSIWYG Editor |
Visual or WYSIWYG (What You See Is What You Get) Editor is intended for work with site pages without the access to HTML code. This is a light version of standard html-editors with hints. The editor has tool area and editing area. Tool area has two bars.
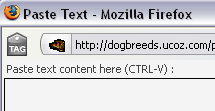
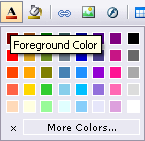
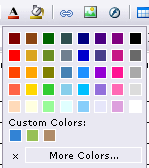
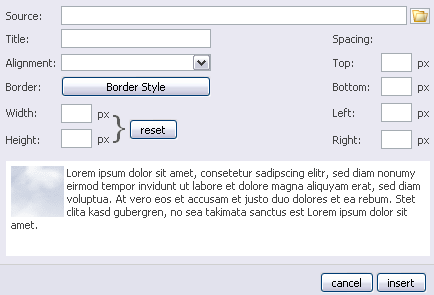
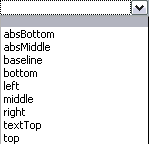
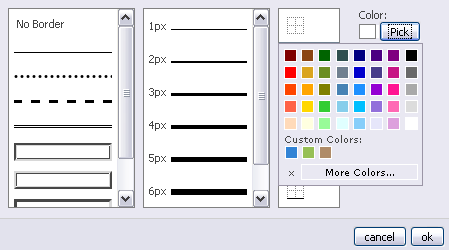
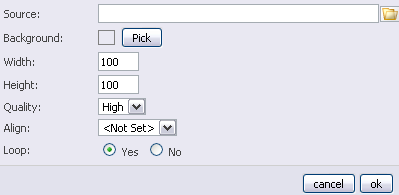
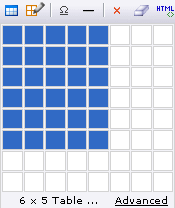
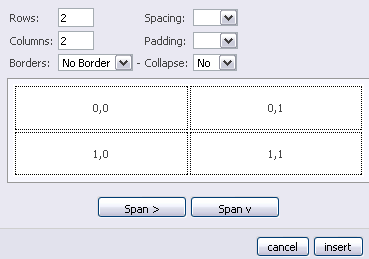
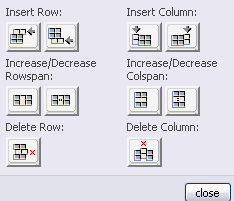
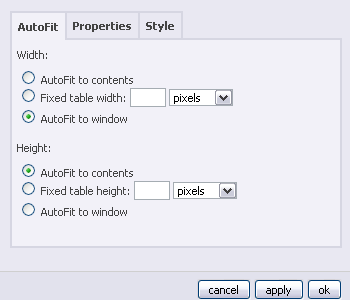
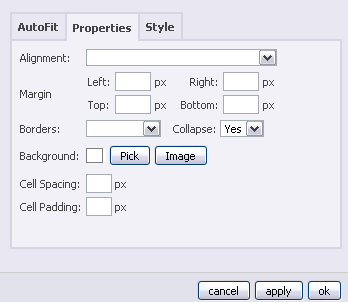
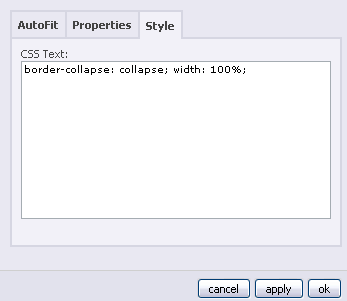
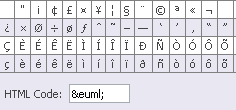
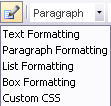
Tools of the upper bar Loup icon. Permits to preview the content (only content, without design). When you click on it there will appear variants of screen resolution, in which you can view the content Paste icon. Allows to paste text from Microsoft Word. When you click on it there will appear a window where you can paste the text Undo (left) and Redo (right) icons. Permit to cancel some action or repeat it. Text Color icon. Permits to set text color. When you click on the icon there will appear a color palette. A cross in the lower left corner will close the palette. If those colors are not enough click on "More Colors" to see a larger palette. Here you can choose Web Palette (256 colors), Named Colors and Web Safe palette (216 colors). Those are palettes accepted for Web-pages. Illustrations, created with the use of such palette, will be displayed on any computer model without any color distortions. There are RGB color model values on the left and a color code (#b0e0e6) which you can paste in page html-code. Below are color samples – the one you select and the current one. So, select a color and click "apply". If you are going to use the chosen color often you can add it to Custom Colors – just click on "Add to Custom Colors" and this color will appear on the minor palette under "Custom Colors". Background Color icon. Permits to choose a color of the background. The work with this icon is similar to the work with the text color (minor and large palettes). Hyperlink icon. Permits to paste URL on a page. When you click on it you’ll see a dialog box with a number of parameters. Image icon. Permits to insert images. When you click on it you’ll see a dialog box with a number of parameters. In the upper line you can select an image from File Manager. If an image is on your computer or some other resource you should first upload it to File Manager. The second field is for the name which will serve as an alt-tag of the image. In the third line you can choose an alignment type for your image The chosen variant is displayed in the lower part of the window. "Border" button permits to select a border for an image (type, thickness, color) In the dialog box you can also specify image dimensions and indents in pixels. An example of the specified values will be displayed in the lower part of the box.  Flash icon. Permits to insert flash animation. When you click on it you’ll see a dialog box with a number of parameters. The window is similar to the window for image insertion. You specify a file in File Manager, background color (by means of palettes), file dimensions, playback quality, alignment and loop (whether to repeat animation or not). Table icon. Permits to insert a table. When you click on the icon you’ll see a simple variant of table making. Select a number of columns and rows by means of the mouse and click to confirm your choice. To make a more complex table click on "Advanced". There will appear a new dialog window where you can choose a number of rows, columns, distance between cells, border, and can merge (span) columns or rows. Edit Table icon. Permits to edit an existing table. Click on it and choose what to edit – cells or the table Table Size dialog box permits to insert, merge and remove rows and cells of an existing table. A cell with the cursor in it will undergo changes. Edit Table dialog box has three tabs In AutoFit tab you can specify width and height of a table. In Properties tab you can set alignment of a table, margins, table boarder and background. Edit Cell dialog box is almost the same and has the same parameters. P.S. You can delete a cell or a table by means of clicking on a cross, situated on table lines In Style tab you can enter additional attributes of a table using CSS language. Omega icon. Permits to insert special characters, e.g. ©, £ etc. When you click on the icon you’ll see a list of characters and a field with the code of a given character below. To choose a character click on it. Line icon. Permits to insert a line, which corresponds to the hr tag. Cross icon. Permits to delete all content of a page. When you click on it the system will ask for the confirmation Rubber icon. Permits to remove formatting. Formatting is a process of changing text appearance for different purposes, e.g. change of color, font, point size, alignment etc. Selection of formatted text and clicking on Rubber icon will return the text to its unmodified state (Verdana, black color, 8-point type, left alignment without indents). HTML icon. Permits to edit HTML code in a separate window. Tools of the lower bar Styles & Formatting icon. Has a drop-down list The work with text, paragraph, lists – similar to the work in Microsoft Word editor. Box Formatting has approximately the same parameters as the Edit Table tool, described above. 'Custom CSS' tool permits to enter CSS attributes in a separate window.. The text formatting panel is similar to that of the Microsoft Word. Includes (from left to right): work with a paragraph, choice of a font, size, making a text bold, italicized, underlined, left alignment, centered text, right alignment, numbered list, bulleted list, right indent, left indent. I'm not active on the forum anymore. Please contact other forum staff.
|
When I click on The Hyperlink Button and Fill in the form, It's only appears the link.
|
SirDarknight, it is normal as far as i know the WYSIWYG (What You See Is What You Get) Editor , makes the link "click able" but still having the same URL name , if you want to use only a name that is clickable like this then i suggest you to enable [ BB Codes Panel | HTML Codes Panel ]
To busy building a passive income online ;)
|
Actually Animorph, I've done this a fair share myself. All you have to do is create the link, then go in and replace the link text with whatever text you wish. For example say I made a link out of 'website.ucoz.com' I'd then click inside the link, type the word(s) I want displayed, and then delete any unwanted characters. Works like a charm.
Post edited by Kyrt_Ryder - Sunday, 2011-02-20, 12:25 PM
|
aju,
Quote (aju) hello how to turn on Visual editor for uers please can anyone help out me please CP->Users->Users groups->Set permissions for all groups->module->Allow HTML tags when adding entries->check the groups you want to be able to use Visual editor->Save |
How can i add $TAGS$ in Visual Editor.
I want the tags to appear in a entry in the Main Page of File Catalog To be more specific. File Catalog->Module design cosumization->Appearance of entries->$TAGS$ Post edited by MitzZa1349 - Monday, 2012-04-09, 5:19 AM
|


| |||
| |||
